Before I pick up where I left off with this instrument, I need to revisit what to call it: in going through some old notes, I saw that my initial idea for the name was "rotola" and I had somehow forgotten that. Being reminded, I realized that this was a much better name, in part because the instrument has little or nothing to do with the violin and viol family of instruments and in part because rotating is a central (sic) part of what makes it what it is. So, henceforth, rotola it will be.
I ended my first post about this project at the point where I had succeeded at cutting and joining an eight-piece, radially-symmetrical pinblock. Because the 3/4" Baltic birch ply from which the pinblock was cut was too thin to function reliably, I had to double it up, creating material ~1 1/2" thick. This was good enough to work as a pinblock, but it was still not as thick as the radius of the resulting octagon, so there would be a hole in its center. Thus:

This caused a problem, in that the axle upon which the body would turn was quite a bit smaller radius than the opening left by the undersized BBP and so needed some bridging material between the two. I settled on using some of the walnut I got for other parts of the instrument, as I was likely to have plenty extra.
Initially, I decided a single plug would be a good solution, so I glued up a few square(ish) blocks:

Then attempted to cut them octagonally:

But didn't quite get my measurements right:

On further thought, though, I realized that this was probably not the best way to go anyway. Making a solid block insert for the cavity would mean that the grain would be aligned to the axle such that the end grain of the block would interface with the long (side) grain of the axle. This would likely make for a weak joint in a place where I needed as strong a joint as possible: the contact between the insert and the axle would bear the brunt of the tension from the pull of the strings. (Similarly, the contact between the insert and the pinblock would also end up being end grain to long grain, so there would be two potentially problematic joints.) The soundboards are not meant to provide a great deal of support, if any; I imagine the instrument being able to support the strings under full tension without any soundboards on it (even though I would not build it that way).
So, I took a new approach, building a radial plug such that the grain of the insert would be parallel with that of the axle. (It would also be in the same plane as the grain of the pinblock, i.e., perpendicular to the radius.) Although a bit fiddly, this was fairly straightforward, as I had already made the jig for cutting the BBP at the correct angle. For reference, here is one set of my successful initial test cuts (left) next to a cut of walnut (right):

Once I had eight walnut wedges, the next step required hand fitting each individual piece into the center, as, inevitably, there were small variations in each of the bits that made up the pinblock:

I was careful to keep track of which was which, as you can see.
Once that was done, I glued it all up. With so many gluing faces (three on each wedge), the glue itself added more than measurable thickness, so it was a pretty tight fit, but I was able to get it all together without blowing the original BBP ring apart!

You can see that there remains a small hole; this was smaller than the diameter of the axle, so it didn't matter.
Once I cleaned up the squeeze out and sanded the faces flat, I could see in my hand this thing I had only imagined before. I began to realize that an octagon is really not very far from a circle after all and, further, that rounding it off would mean losing fewer layers of the pinblock than I had expected. It occurred to me that it might actually be fairly easy to make the instrument cylindrical, as I had initially envisioned. Thus:

Additionally, I could see that the pinblock was overall much larger and more robust than I had pictured in my mind, making room for more than one pin -- and therefore string -- than I had thought:

(This is a pic from before all the above happened, when I first started considering how much bigger the pinblock was than I expected.) Looking at the pinblock from above, imagine these two pins going down into the block, rather than laying along it: even with two, each pin has plenty of wood to anchor in, especially when you consider the pin density in the block of the bowed psaltery I made a few months ago, which is thinner and longitudinally about the same:

You can easily imagine the pinblock supporting twice, even three or four times the number of pins. That's a question for later, as the issue mentioned above of a structure for supporting the string pressure would have to be resolved -- although I do have some ideas about how to do that.
In any case, it seemed obvious, given how close it was already, that the rotola should be round. It turned out that the void left by the walnut wedges was much more accurately in the center than I expected, so I began brainstorming for ways to take advantage of that, especially considering my limited tools. In the end, though, I decided that my current tools and equipment were insufficient to produce the result I wanted with the accuracy I believed was needed, so I decided to splurge on a bench sander, something that I will use a lot in instrument building, anyway. This was back in February, but it is still out of stock as of this writing; it seems I'm not the only one who decided to build or expand their woodshop during the pandemic.*
Once I realized that it was going to be a while before I could take the next steps with the pinblock, working on the soundboards became the obvious thing, but now with a new, literal, twist: if the rotola was going to be round, the soundboard parts had to be sections of a cylinder, not just flat rectangles. Again, after quite a bit of online research (it's ridiculous how much of this project would be impossible or nearly so without the Internet), I decided on a method for shaping the soundboards: steam bending with molds. I imagined two, 2' long, laterally curved (i.e., perpendicular to their long dimension) parts to the mold, one concave and one convex, the latter's radius being 4mm shorter -- the thickness of the spruce stock I had for the soundboards. The mean radius needed to be a bit tighter than that for the pinblock, as steam-bent wood snaps back somewhat, so I made my estimates and got to work.
As I've written elsewhere, I have been taking a very conservative approach to the pandemic and have left the house only a few times for pressing personal care needs (medical, etc.). Thus, the materials I have available for this work are either special ordered -- and therefore inordinately expensive -- or scraps. That, in turn, meant that the material I had for making these molds was the most twisty and knotty bits of leftover construction lumber from building my workshop last summer. Producing stock that was thick, square, and straight enough to carve accurately took some (read: a lot of) work, but it was also useful practice for me, as I am very much a novice woodworker.
Once I was able to build up some usable basic material, I cut the convex side of the mold first, as it was much simpler and easier a job, using techniques I've seen for carving guitar necks. Unfortunately, I didn't take pix of this process; I just got caught up in the excitement of it, I guess. However, at the end of this post you'll see it and how it works. The concave side was going to take quite a bit more work, along with some new blades for my router. The plan was to hog out as much as possible with a curved router bit, then use some finishing tools to get the final profile. Overall, that's what I did, but I learned some significant lessons along the way.
Here's the beginning of the routing:
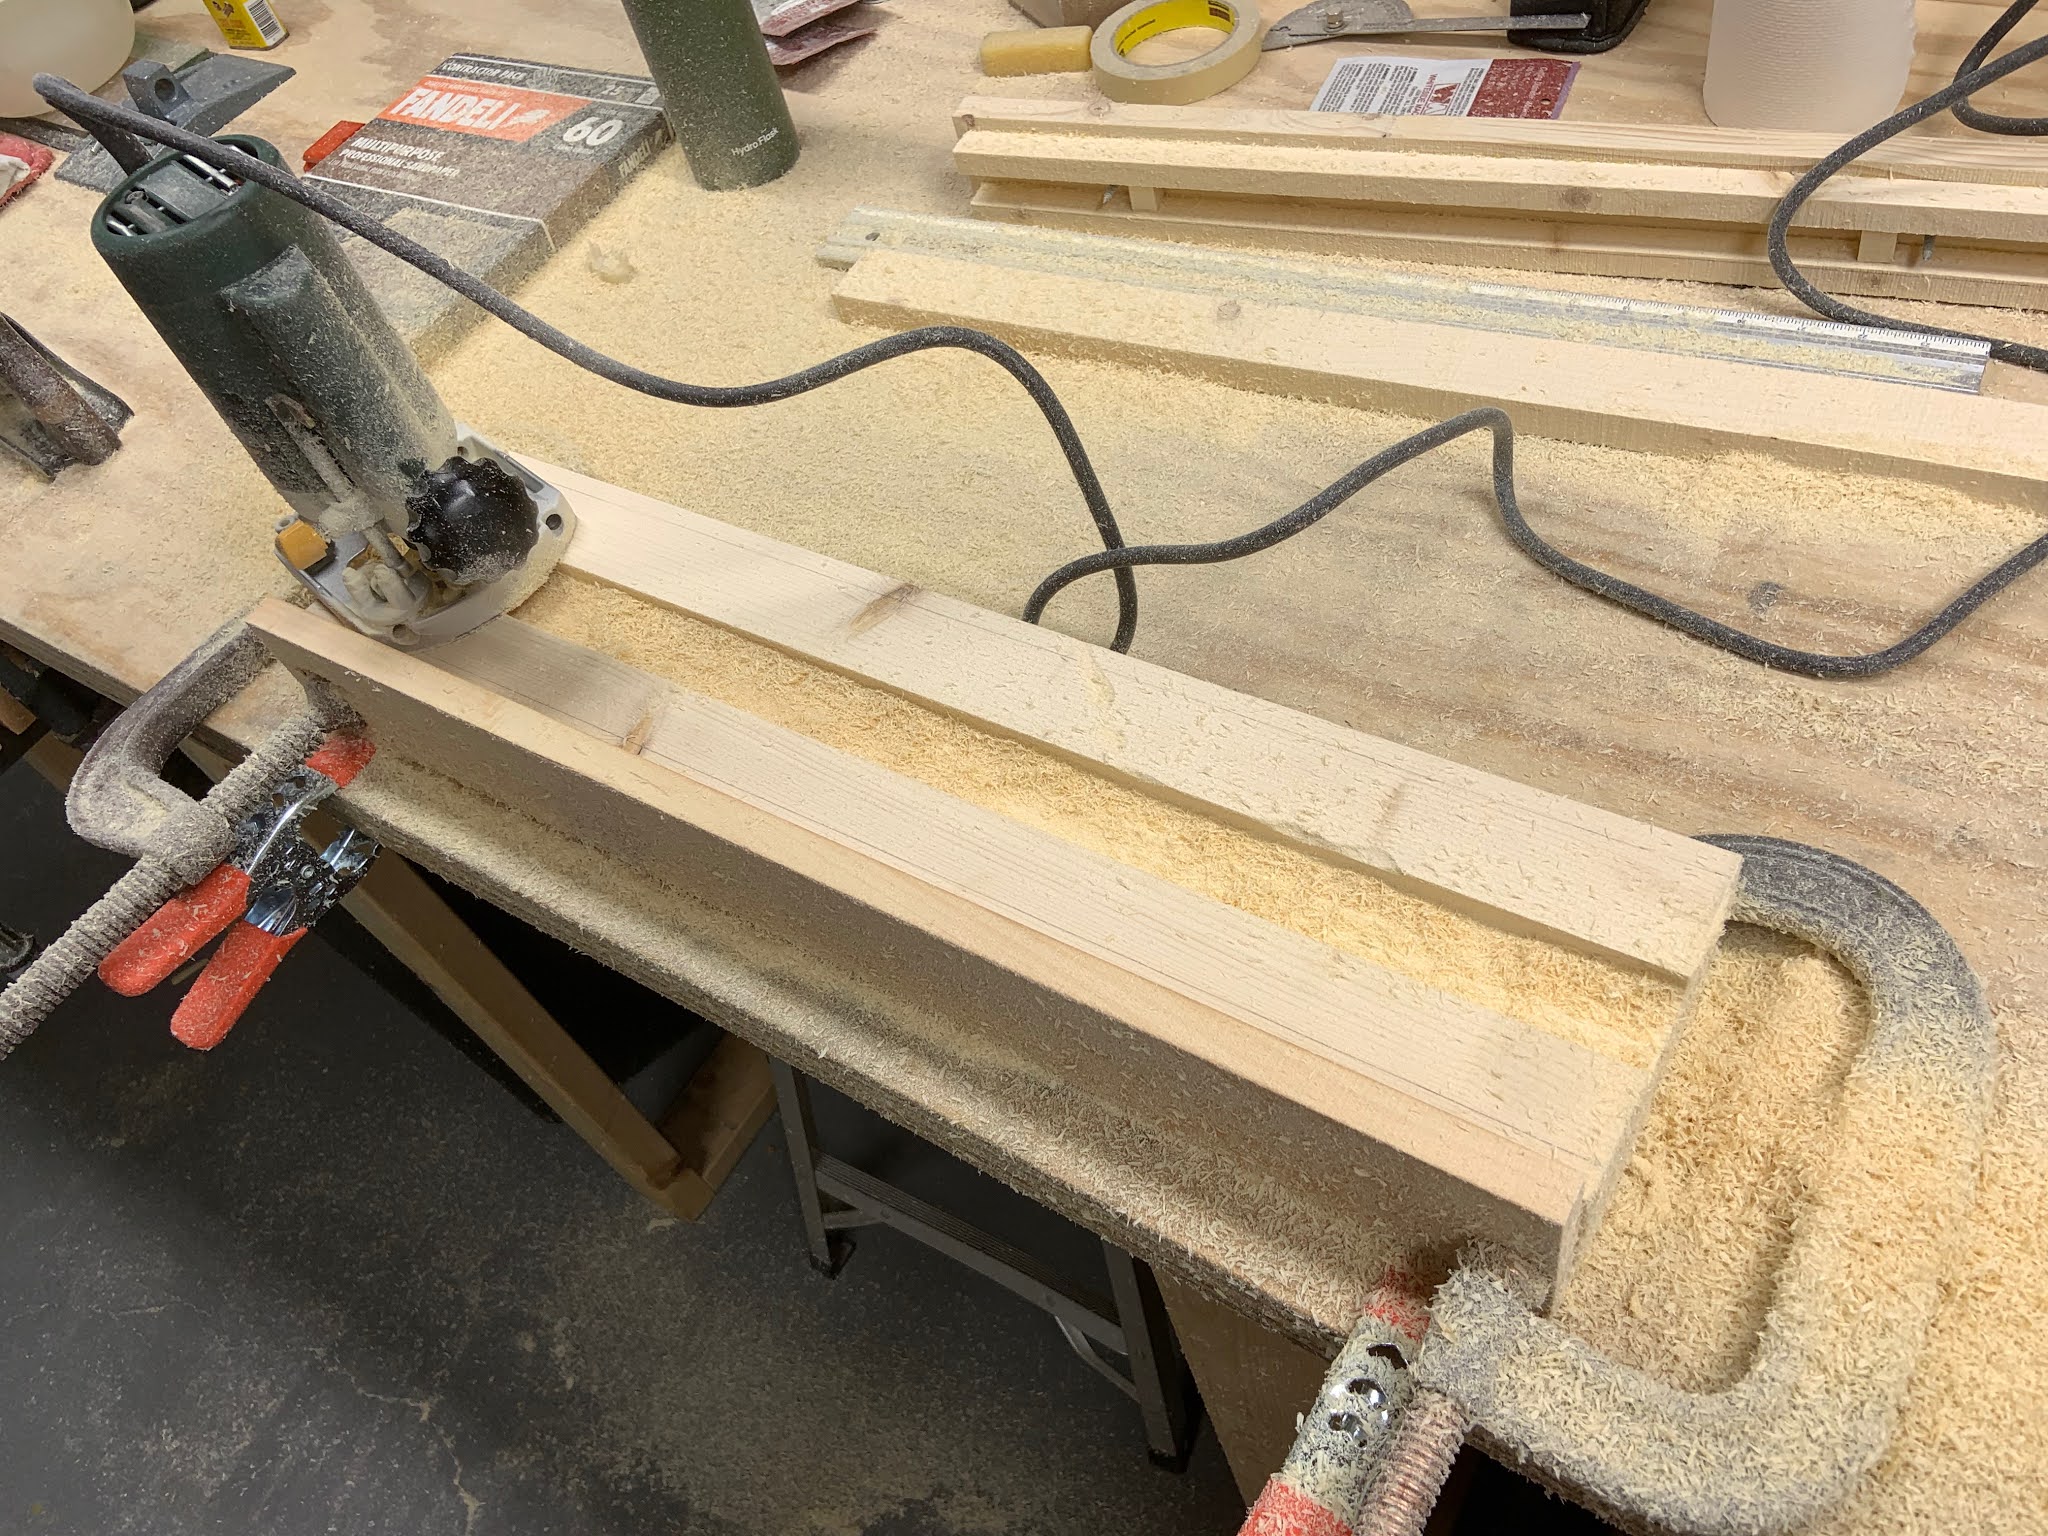
As you can see, it generated quite a bit of sawdust -- and this was just the first few passes! Again, my novice status was dramatically betrayed by my amazement at how much yellow snow was generated by pulverizing just a few dozen cubic centimeters of wood. My entire workbench was coated in variously thick layers of powdered tree, so, after this, I moved the project off the bench, which has far too many small things upon which dust can settle, and into the middle of the floor, where I could just shake myself off and sweep up. (My next router will have dust collection.)
Work progressed slowly but fairly steadily. I needed to come up with a series of jigs for precisely guiding the router one of which you can see in the upper right of the first pic:


If you look closely at the last pic, you can see that my cuts are about half a millimeter west of the guide mark and that the top four cuts (two uppermost levels, right and left) are just a bit wide. The latter turned out not to be a problem, as the convex side of the mold sits much lower than that in the concave mold and, more relevantly, the strips of spruce I'll be pressing are not wide enough to come up that high anyway. The former wasn't a problem, either, as the overall cut was symmetrical and the correct radius; the misalignment was more a function of my guide mark being off center. All that said, the mistakes were useful lessons.
Hogging done, I now had to figure out a way to finish the arc. Initially I thought I'd scrape it and spent a fair bit of time trying to get my new curved scrapers ready for first use. I had not held a wood scraper in my hand for more than 35 years and had never prepped a new one myself; indeed, I'm not certain I was ever particularly good with them despite having a couple of mentors who swore by them. As it turned out, however, (and as probably anyone who used scrapers effectively would have told me) even a well-sharpened scraper was not the tool for this: there was simply too much material to remove yet and scrapers are for fine finishing.
So, I returned to a method I've been using a lot: coarse-grade sandpaper. I cut a convex block to the same radius as my concave mold (remember, the convex mold has a radius 4mm shorter than the concave half), stuck some 60 grit to it with some tacky spray, and went to town. (As I write this, it occurs to me that I should have accounted for the thickness of the sandpaper, as 60 grit is probably at least a millimeter thick, maybe more, and would thus increase the radius of the mold; that, in turn, would reduce the correction for the snap-back after the steamed wood dries. More on that below.)
This is what it looked like:


In the last pic, you can see that I was having an especially hard time with the ends of the mold. It turns out that the stock at each end had a cluster of small knots, making the wood harder to sand (and harder to do so evenly). Further, regardless of the knots, the ends just didn't sand as quickly, as I was taking care not to round over the edges with the sanding block. If you think about it, the ends only get like half the sanding that the middle gets, just by virtue of not getting full strokes. In the end, it took a good hour or more of meditative work, but I ended up with a serviceable surface (unfortunately, I seem not to have taken a final shot of this).
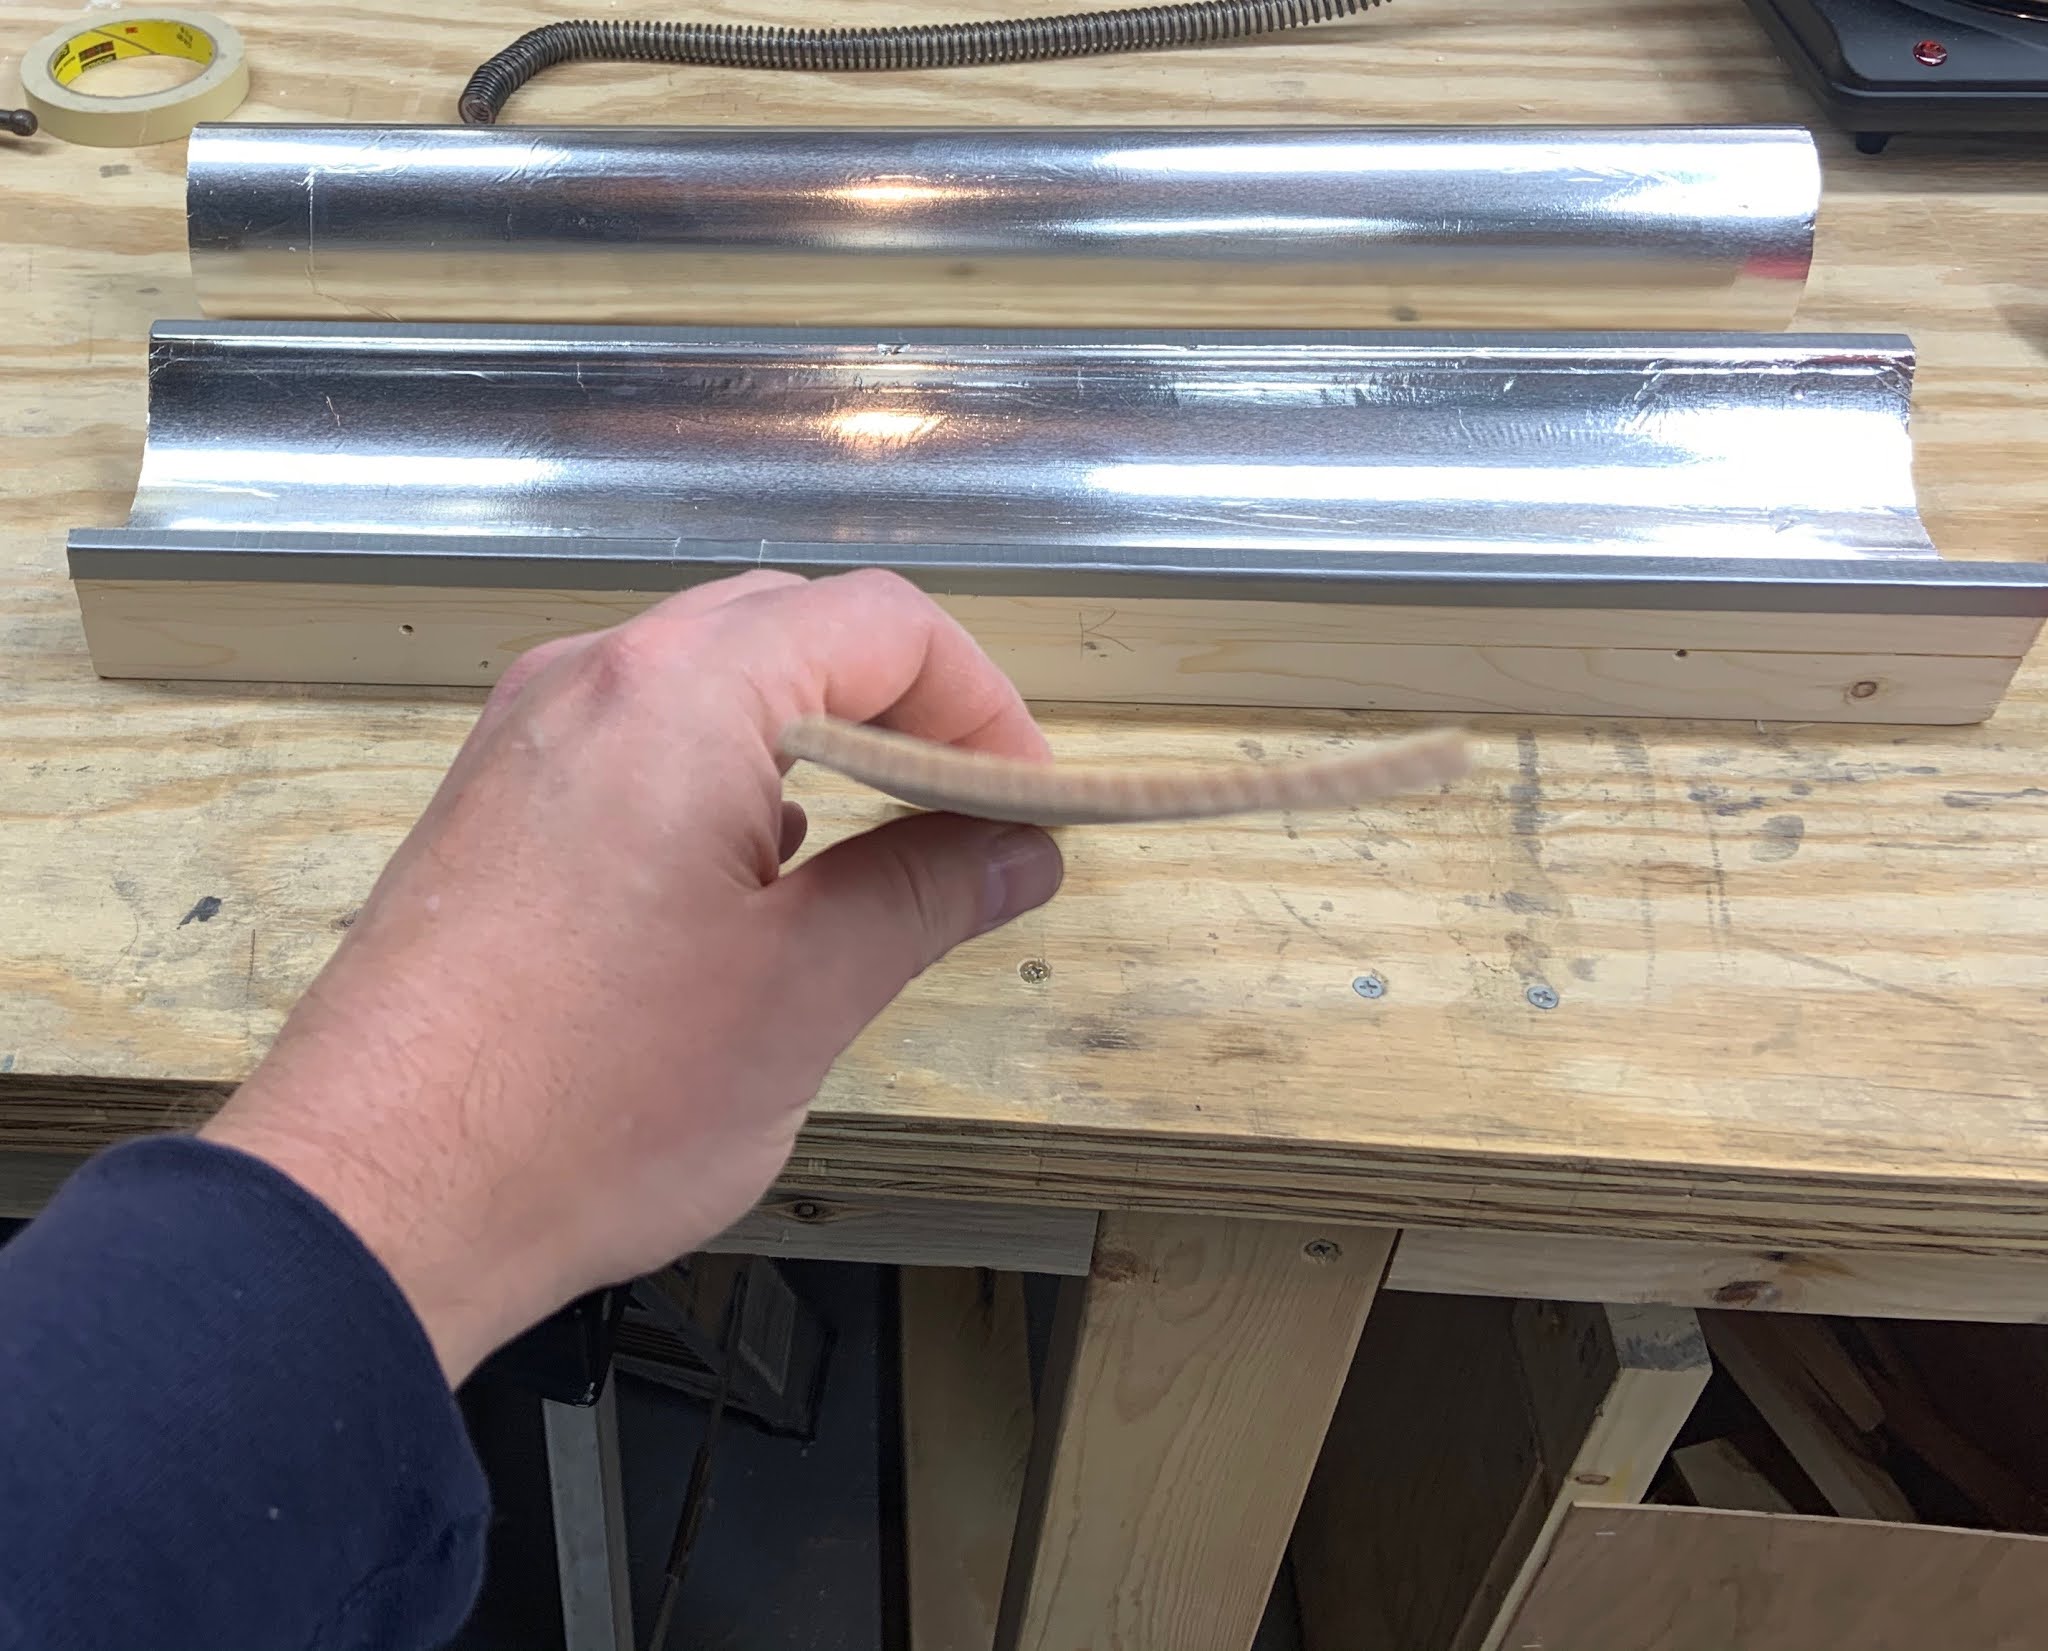
That done, I now had to figure out how I was going to seal the molds. This was soft wood, really not much, if any, harder than the spruce I'd be using for the soundboards, so I needed to protect it from the steam. I brainstormed several options, but opted for aluminum foil: it didn't corrode and was water resistant, easy to use, and handy. Lightly coating the molds with tacky spray, I applied the foil as carefully as I could and ended up with these:

Next step, of course, was steaming! I needed to test my setup, however, and didn't want to risk my actual soundboard material, so I used some of the offcuts from building up stock from the construction lumber; as it turns out, I had several bits that were roughly 4mm thick with close to quarter-sawn grain. I planed one of these down and cut it to a similar size as what the soundboards would be. I bought a hot plate (I plan on using hide glue on some projects, too, so this will be handy in several ways) and a cheap tea kettle. I scrounged some hose from an old CPAP machine and, for the bag, used a poultry oven bag (it turned out, only the latter was heat-tolerant!). Once set up, I tossed the test piece in the bag, sealed it all up with duct tape, and let it go:

I really had no sense of how long this should take, but I let it steam for a good 20 minutes or more. I then quickly removed the wood and clamped it in the molds:


It took a great deal of willpower to let this sit undisturbed for 24 hours, but I succeeded. Unsurprisingly, given the molds' aluminum lining, the test strip was not dry when I opened it, but it did have a curve! It also retained it once it dried, albeit predictably attenuated.

Overall, I'm very happy with this. The next step will be to round off the pinblock, so I can get the exact radius I need for the soundboards. It's reasonably likely that I will need to make new molds, but that should be easier than this was, not only because of my experience from this, but also I'll have a better router and will be able to go out and get new and better wood (spoiler: my family is getting vaccinated!). In the meantime, I'm going to do some non-musical-instrument related puttering in the workshop (re-setting up a plane, organizing, maybe making some tool accessories) and also return to music-making (I have a couple of unfinished projects waiting). I hope this has been interesting -- or at least entertaining -- and am excited about sharing the next steps with this build!
---------------
* Surprisingly, I couldn't find any research indicating an increase in demand for woodworking tools and materials during the pandemic, but participants in online forums seem pretty consistently to report increased prices on wood and outages and waitlists for tools across the board since COVID began. Popular perception seems to be this is due to increased demand, but one article I saw suggested it was decreased production instead. In either case, th'r'ain't much out there fer th'gittin'!
No comments:
Post a Comment